
When it comes to making a website stand out, there are hundreds, if not thousands, of factors that go into creating a good website that receives plenty of attention.
Many people stand up a website and over-rely on their chosen theme. However, as we will show in this WP Rocket overview, sometimes you need more than just a good theme to be noticed online.
The content you are publishing is essential, it’s so much of what makes a website become a hit, so why not maximize the user experience while you are at it?
How SEO interacts with the content and layout of your webpage, is about how you say it online, as much as what you are even saying.
It is no small wonder then that, as the Internet has become such a ubiquitous part of everyday life, the algorithms that power its searches have become more and more specialized.
Many businesses would start to sell themselves as effective website builders.
They have helped newcomers enter the market by making a website that is going to be one of the first search results that you find when you type in your keyword search.
Many businesses have used WordPress to become very successful with this model, helping many new web pages make it to the first 2 or 3 pages of results.
We’ll be covering the issues with this model, and the use of plugins for websites, as well as focusing on one particular helpful caching plugin that has become popular, WP Rocket.
Table of Contents
WordPress Plugin and Page Builder Bloat
With so many people using WordPress, the average quality of webpages, certainly in terms of formatting and structure, has also increased.
At first glance, this may appear intimidating. If everyone is on the same playing field regarding quality, how does anyone stand out anymore?
The real issue that many new people who are starting websites now find is that the WordPress model makes it easy to publish content without any indication of required optimization.
We suppose the good thing about WordPress powering nearly a third of the Internet, it makes it easier to stand out with a little optimization. Plugins can help tip the scales for WordPress in this area.
The additions and customization they often bring to a website not only help make your website more optimized than your competitors but will also make them run smoother, as opposed to the same bloated cookie-cutter setup that everyone else is using.
This is where WP Rocket comes into the equation.
What Is WP Rocket?
WP Rocket is an all-encompassing cache plugin that has been tailor made and optimized to work with WordPress websites.
It is designed to be a plugin to tackle loading times that can often detract from the overall traffic that a website can receive.
It also helps alleviate any issues that having many cache plugins attached to a website can bring to a webpage, which is the primary reason the plugin was first released in 2013 to tackle.
WP Rocket has an interface that is easy to use, requires little setup to start making it work, and has excellent customer service and support. This makes WP Rocket excellent for beginners to get started.
Why Page Speed Matters
Some of you may be wondering if page speed is really that important. After all, Google seems to go back and forth on its stated importance. Is page speed a ranking factor? The short answer is yes!
Making your website snappy, with a good user experience, will increase your chances of ranking higher on a Google search.
Put yourself in the searcher’s shoes for a moment. How do you feel when you’re looking for something, and the website doesn’t load quickly or even at all? Do you try to load a different page or abandon the site completely after a few seconds?
Improve page speed and see your retention increase.
This also leads to our next point, which is to do with how caching, compression, and loading times affect your website’s Search Engine Optimization (SEO). SEO can determine not only where you appear in search results, but how those search results look as well for a particular search result.
Ideally, your webpage should appear within the first 5 listings of a search result, as turning over from there includes massive dropoffs in people’s searches.
Many factors can affect how optimized a website is for a search. The layout of articles, pages, word counts, keywords, topics, authority, and more are often the focus of SEO optimization programs.
Other factors will also affect a webpage’s SEO, such as loading time, and size of the page in the bandwidth that is used to load it.
Therefore using WP Rocket can reduce the number of KBs (and even MBs) it takes to load a page.
Besides cutting the loading time down, there are small, yet significant ways to make your website more likely to turn up higher in a web search engine.
Installing And Activating WP Rocket
Sounds great so far, right? Even if you don’t use WP Rocket, caching is more important than you realize.
So, if you are interested, check out the following steps below to install and set up WP Rocket on your website.
One aspect of WP Rocket that is different from many other WordPress plugins is that it doesn’t upload to your webpage automatically, which means that you’ll have to do this for WP Rocket manually.
Once you have downloaded the plugin, you must go into the plugin file to upload it.
- Go to your dashboard in the admin area.
- Plugins, then Add New.
- Then finally select Upload.
- Click the Activate link to get started. Review any warning messages or first time notifications.
Be sure to enable WP_CACHE within your host before moving on to WP Rocket Settings.
Navigate to WP Rocket Settings
Upon clicking on Settings, click on WP Rocket, and you will see your green congratulations message, indicating WP Rocket is successfully activated with best practices applied.
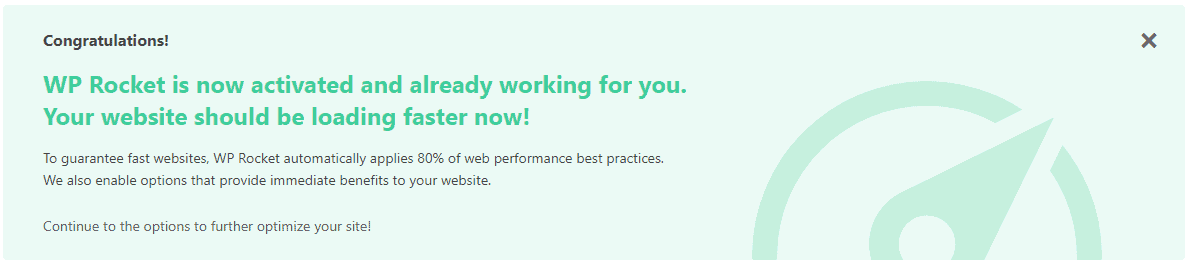
Activating WP Rocket will put settings into place automatically for you, up to applying 80% of web performance best practices from jump street.
However, just activating it by itself won’t solve all of your problems. To get things just right for your website, you’re going to need to adjust some of the settings.
Configuring Your WP Rocket Settings
Generally speaking, these are the options that you should set up and test for yourself first, before making additional changes:
- Minify CSS files.
- Minify JS files.
- Combine your Google Fonts Files.
- Remove query string from the static resources.
- Combine your CSS files.
- Optimize the delivery of your CSS files.
- Combine the active JS files.
- Select safe mode for jQuery.
- And load your deferred Javascript files.
Make sure that you select the Save Changes button when you are done.
These items will help minimize tasks and processes slowing down your webpage loading times.
The settings appear tricky at first, but once you learn a little more about what they do, the ease of use of the plugin increases. This and the maintenance of the plugin is the main selling points.
WP Rocket Dashboard
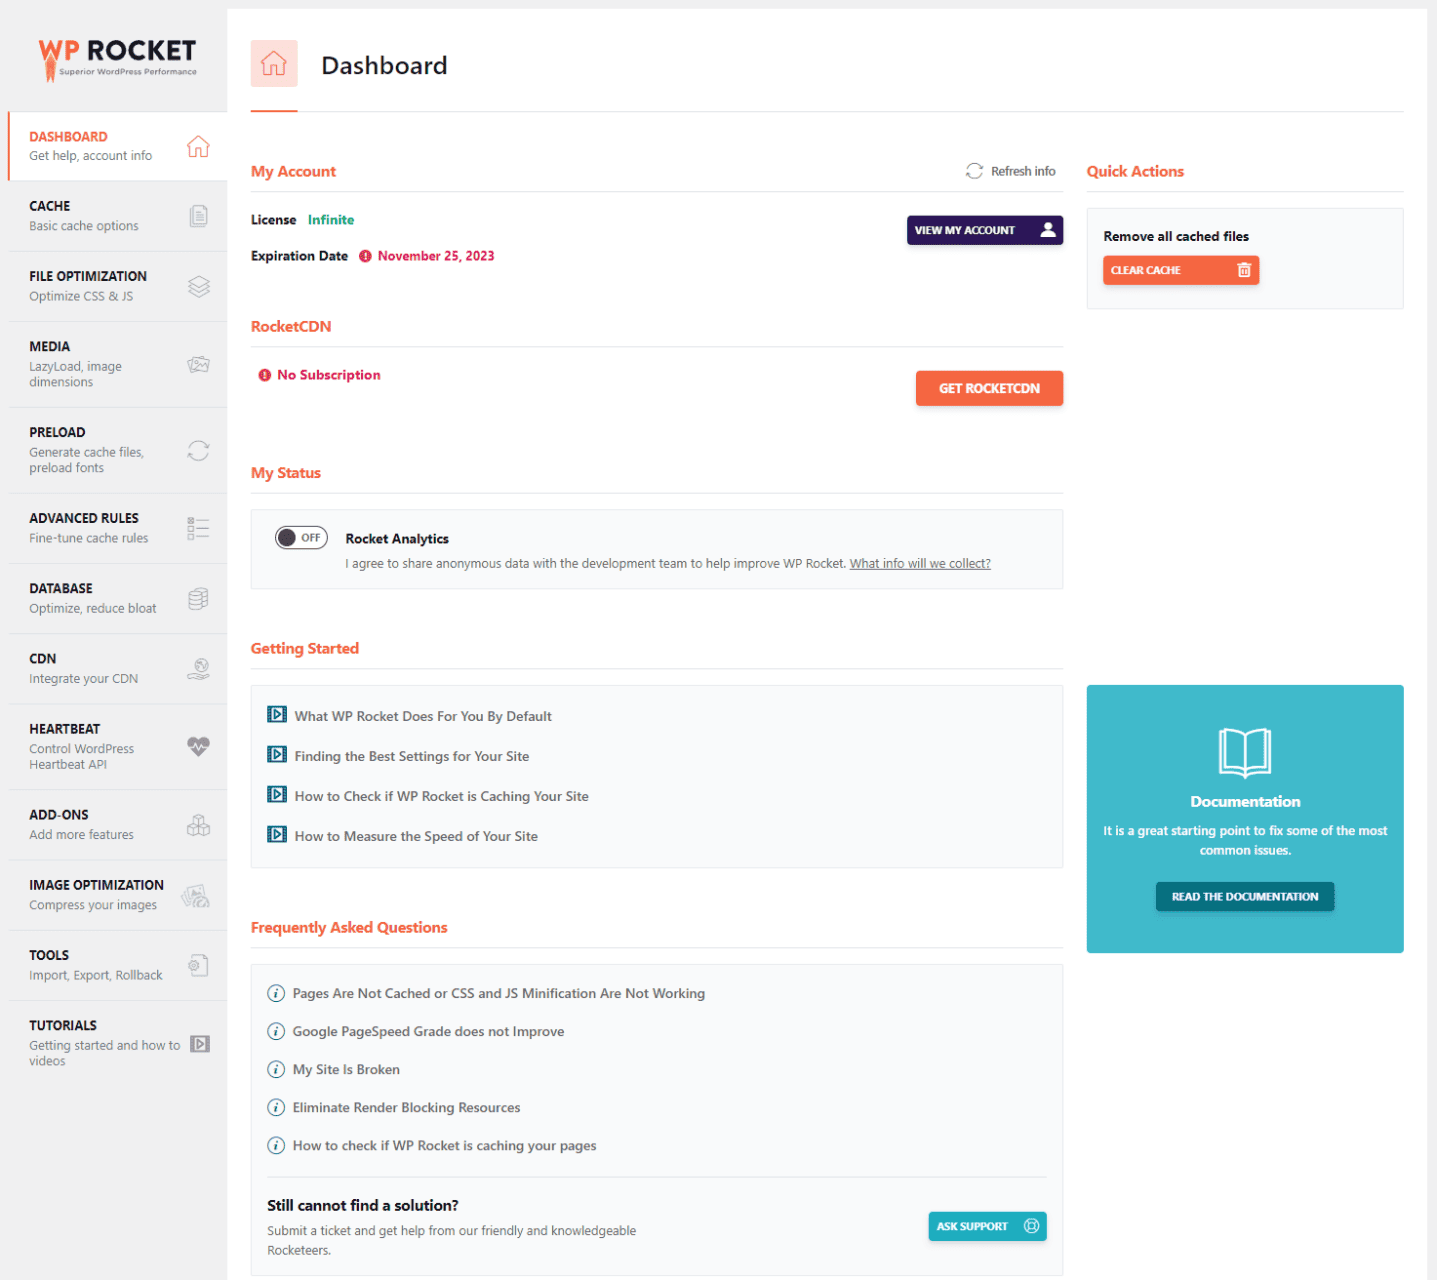
The WP Rocket Dashboard menu doesn’t have any main settings. But you can do the following:
- Review your account info.
- Stop sharing analytics. It is recommended to keep this off to gain a small performance boost.
- Review Getting Started videos.
- Review frequently asked questions.
- And clear all cached files. This is useful for clearing the cache if you aren’t seeing your changes on the front end.
WP Rocket Cache Settings
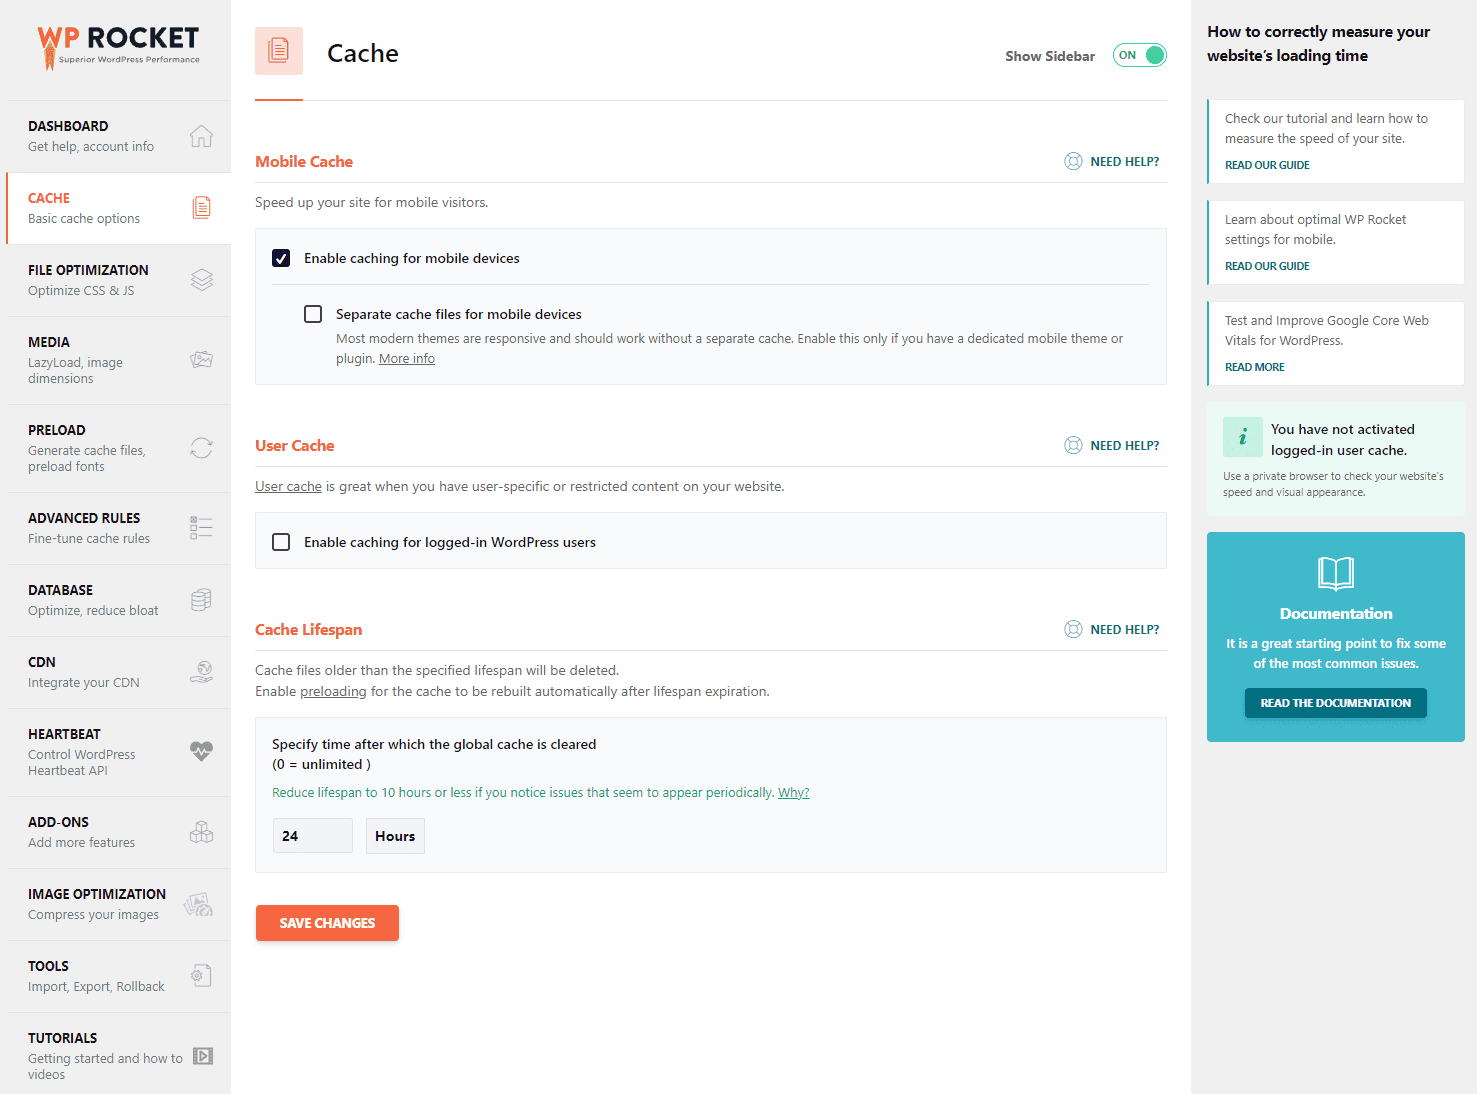
There isn’t a way to disable caching directly, so if you are using another plugin, server caching, or another caching plugin, you will need to use their helper plugin to disable page caching.
In most cases, it would be wise to leave this alone. Just don’t use 2 caching plugins at the same time.
For the Cache Settings here:
- Mobile Cache – Enable this as it turns on caching for phones. If your website isn’t responsive, you can keep this off. Check out their Wrong Display for Devices help documentation if there’s trouble.
- Separate cache files for mobile devices – Keep this disabled unless you have separate mobile assets.
- User Cache – You can keep this disabled unless you have user-specific content for subscribers. If you do, you may need to review their Cache help documentation to find specific helper plugins to prevent or configure the cache for users. Just know there is a CPU performance hit if you enable this.
- Cache Lifespan – Initially set to 24 hours, then raise it if possible. The higher this number is, the less CPU resources you will use. If you can get away with a higher lifespan, do it. There is also a helper plugin to prevent automatic cache clearing if you need it.
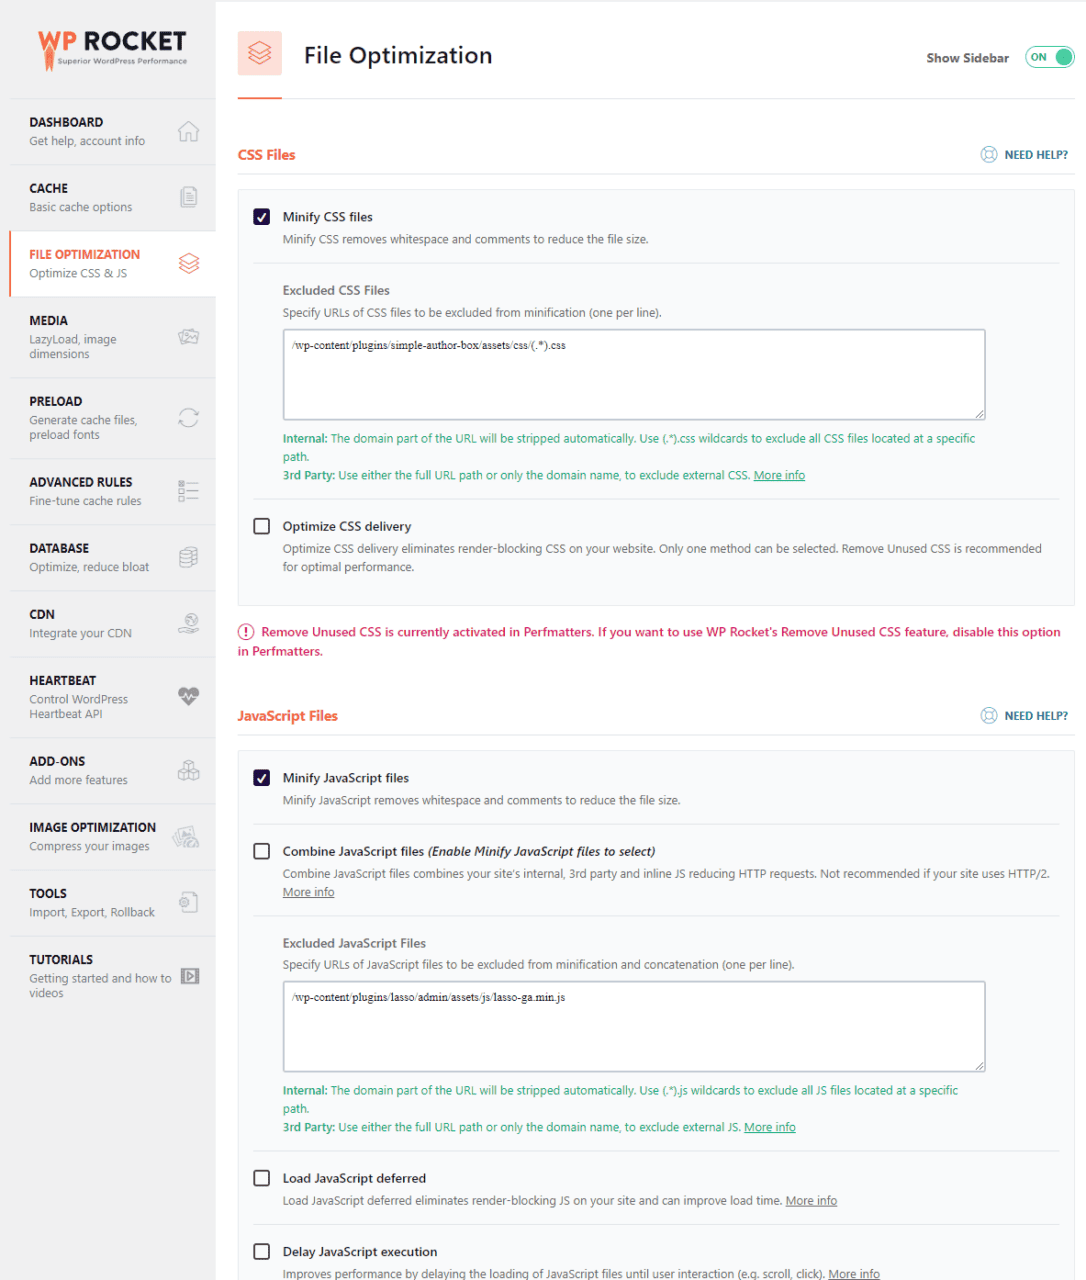
WP Rocket File Optimization Settings
These settings can greatly contribute to your core web vital scores so it’s important to experiment with them to find which settings work best for your setup.
For the CSS settings here:
- Minify CSS files – Enable this setting unless you use another plugin to remove unused CSS or something like Cloudflare APO. Minifying is an optimization that reduces file size by removing whitespace. This makes the files harder for you to read but makes no difference to your browser.
- Combine CSS files – You can keep this off unless you want to fine-tune your CSS calls manually. It’s usually not worth the time, especially with large CSS files. You can also run into issues with HTTP/2 and HTTP/3 servers. If you are using another plugin to handle this and it is recognized by WP Rocket, you will not have the option to combine CSS files.
- Excluded CSS files – Enabling Combine CSS files will most certainly break your site. So here’s where you can add the CSS file(s) giving you issues. You can check out Resolving issues with Minify CSS files on WP Rocket help documentation for more info.
- Optimize CSS delivery – Keep this off if you are using another plugin to manage this. Also, you may want to keep this off, as enabling this may disrupt your page layout. The Remove Unused CSS suboption is the better pick over Load CSS Asynchronously as it gives a better experience for your users. Again, this may break your site. To fix this, you would either need to generate your critical CSS and copy the code into fallback critical CSS or use their helper plugin to exclude files from load CSS asyncronously.
For the JavaScript settings here:
- Minify JavaScript files – Same as the CSS setting. Enable this setting unless you use another plugin or Cloudflare APO.
- Combine JavaScript files – Same as the CSS setting. Keep this setting off. Using this with dynamic inline JavaScript can cause a bloated cache folder. This setting doesn’t work properly when Delay JavaScript execution is enabled below, so this option would be grayed out anyway.
- Load JavaScript deferred – Start with this setting enabled unless you have it enabled somewhere else. This loads JavaScript files after the page loads. This can potentially break your site or make it appear to lag, so be prepared to add Excluded JavaScript Files as you discover them.
- Delay JavaScript execution – Start with this setting enabled unless you have it enabled somewhere else. This delays JavaScript file loading until a user interaction occurs, such as clicking or scrolling. This one will most certainly break your website, so be prepared to add Excluded JavaScript Files. You can get a headstart on this by checking out the Delay JavaScript Execution compatibility exclusions help documentation page.
WP Rocket Media Settings
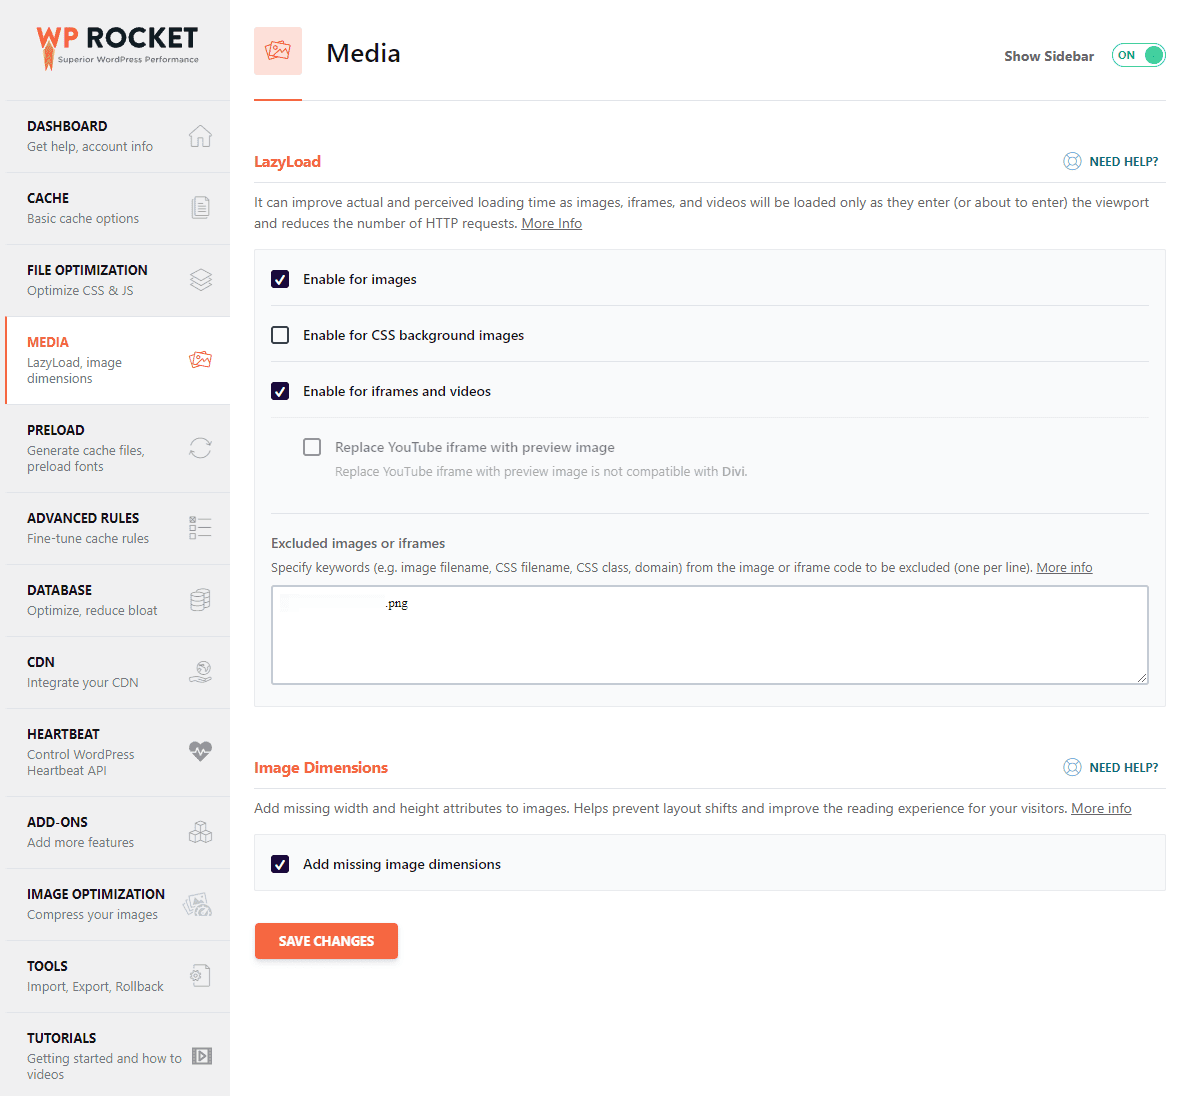
For the Media Settings here:
- Enable for images – Enable LazyLoading for images unless you have it enabled somewhere else. This delays the loading of images until they near the user’s viewport. This is surprisingly useful. This feature may not be compatible with other plugins or theme page builders. Be sure to test this to make sure you are getting the benefit.
- Enable for CSS background images – Enable this setting as well unless you have it enabled somewhere else. This may cause problems, so be prepared to disable it. This does not work well with combined CSS features.
- Enable for iframes and videos – Enable this setting unless you have it enabled somewhere else. This is pretty much the same thing as LazyLoading images, but for embedded media.
- Replace YouTube iframe with preview image – Enable this if you can. This replaces an embedded YouTube video with the thumbnail image until a user clicks on it. This will significantly decrease your page load times if you use embedded videos in your content. Some themes, like Divi, will show this option greyed out. Other plugins may allow you to enable this.
- Excluded images or iframes – This is where you exclude LazyLoading your media elements. Anything above the fold should go here. You can also Exclude a specific number of images from lazy loading by targeting an attribute using a helper plugin, as noted on their help documentation.
- Add missing image dimensions – Enable this unless you have it enabled somewhere else. This adds both height and width attributes to images to prevent layout shifts after an image without these dimensions loads. This is absolutely necessary.
WP Rocket Preload Settings
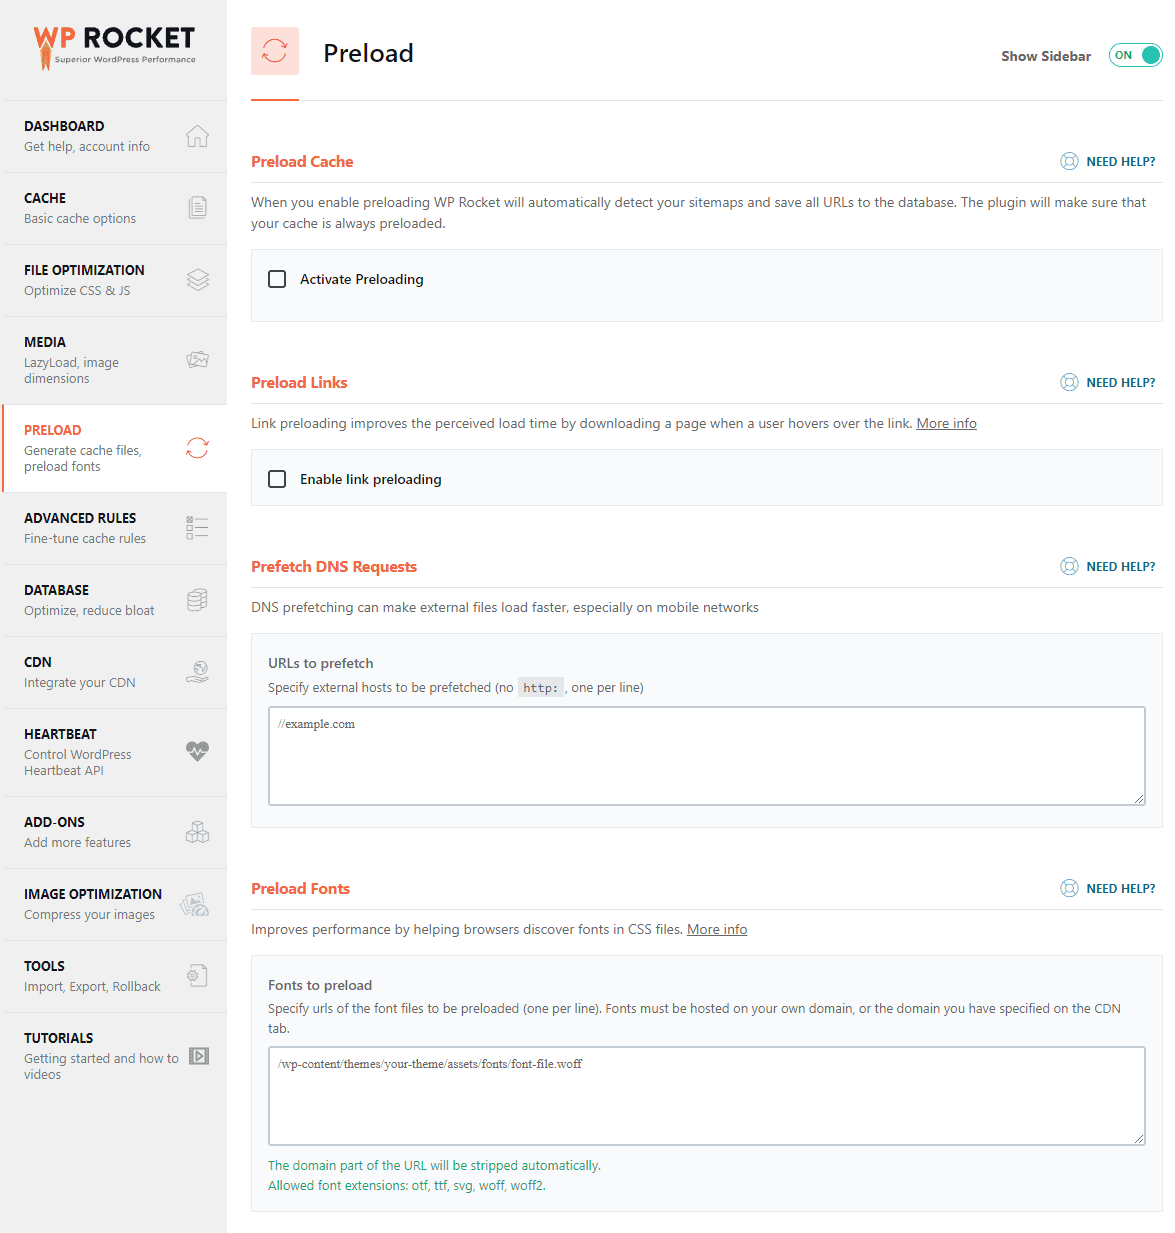
If you are not careful here, you can greatly increase your CPU usage. Some hosts do not allow you to preload, as this feature can be taxing on servers.
For the Preload Settings here:
- Activate Preloading – Enable if your host supports it otherwise keep it off. This setting helps browsers fetch resources before they are needed. You can review this Preload cache help documentation for more info.
- Activate sitemap-based cache preloading – Enable if you have preloading enabled. Review which sitemaps are important and add them in the Sitemaps for preloading box, like your posts and pages. You will also see SEO plugin-specific options below this option as well. Only enable these options if absolutely necessary.
- Enable link preloading – Enable if your host supports it otherwise keep it off. This allows a link to be preloading when a user hovers over a link for more than 100ms on desktop or touches the link in mobile. This is great for the user’s experience but may cause CPU usage spikes on your host.
- Prefetch DNS Requests – If you are using Google Analytics, Ads, or other external resources on your site, you can use this area to speed up load times. Don’t fret too much here. The only reason why you should bother here is if there’s a priority third-party domain that isn’t already included in the tools you use. Do not put anything here if your host doesn’t support preloading.
- Preload Fonts – If you have the Remove unused CSS option enabled, there’s nothing to do here as WP Rocket will preload fonts automatically. There’s also nothing to do here if you use third-party fonts. Only self-hosted fonts can be preloaded. You can add your important, local fonts here as necessary. Do not add too many fonts. This will give more performance problems than it fixes. Do not put anything here if your host doesn’t support preloading.
WP Rocket Advanced Rules Settings
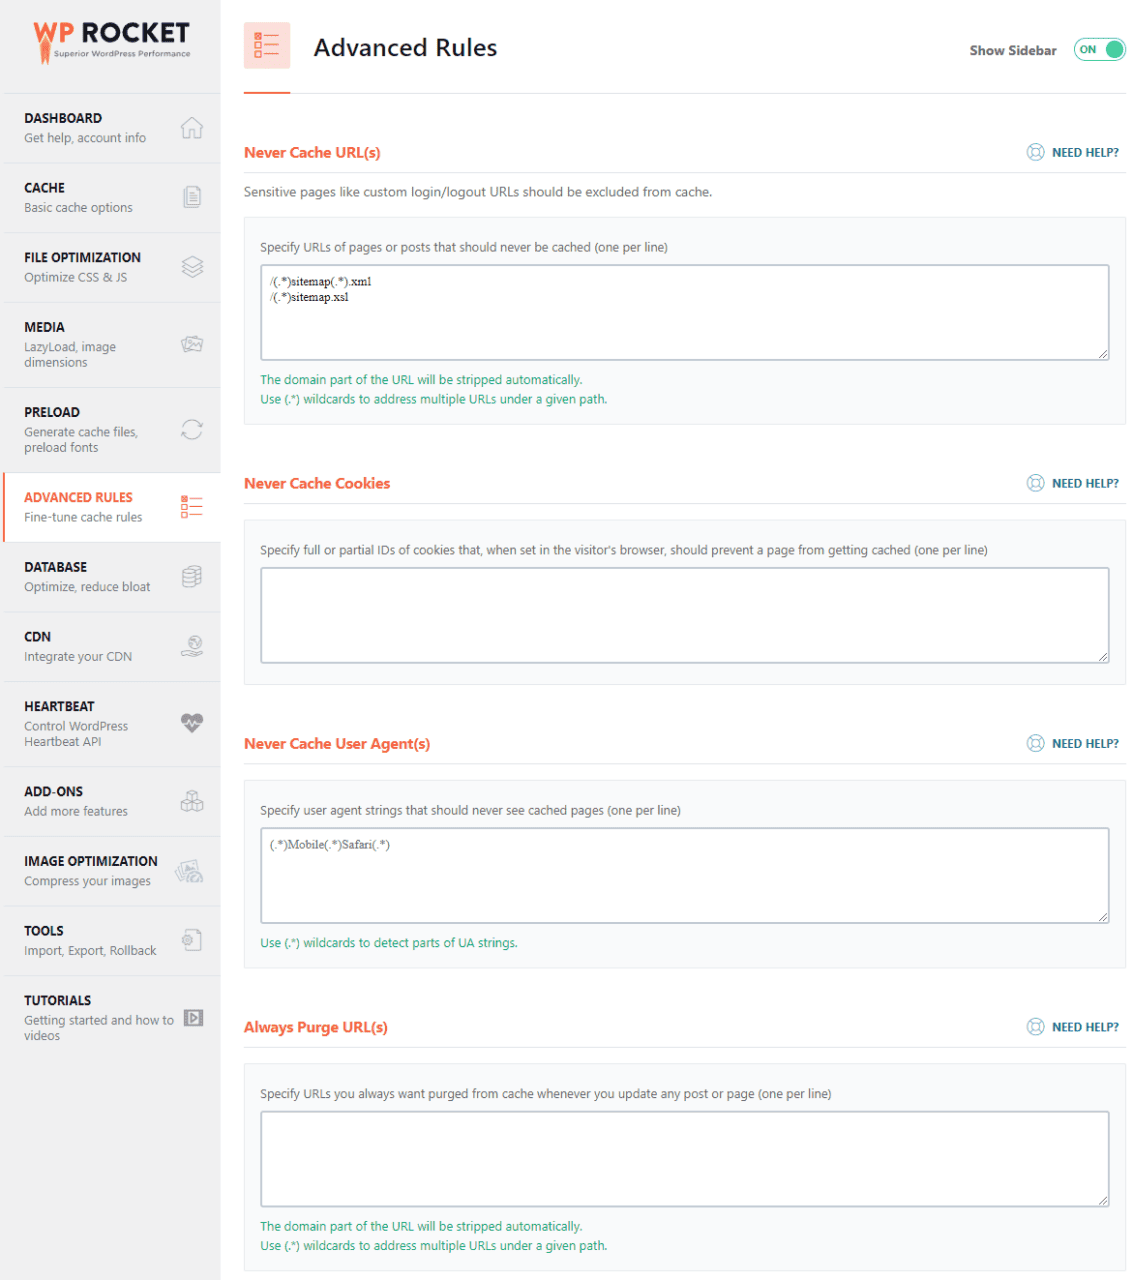
The Advanced Rules here are not common so don’t worry about filling up these boxes too much.
For the Advanced Rules Settings here:
- Never Cache URL(s) – You can enter your pages that should be cached from plugins that are not supported by WP Rocket, like checkout pages from your new eCommerce plugin.
- If you need to update your sitemap as I had to, you may want to temporarily add your sitemaps to this box:
/(.*)sitemap(.*).xml/(.*)sitemap.xsl
- Never Cache Cookies – Same as above, but with cookies.
- Never Cache User Agent(s) – Same as above, but with user agents. Useful for Googlebot, for example.
- Always Purge URL(s) – If you have pages other than your homepage that need to be cleared when new content is created, add it here.
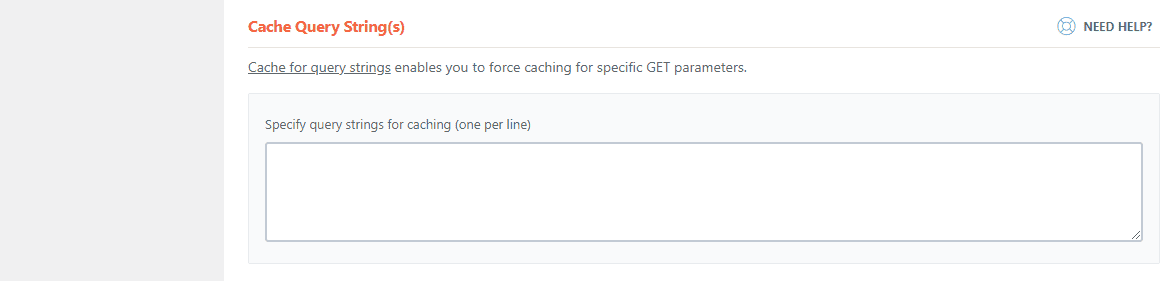
- Cache Query String(s) – Add query strings you want to be cached as they are not cached by default. The query string is everything after the
?in a URL. For example,example.com/?string=example.
WP Rocket Database Settings
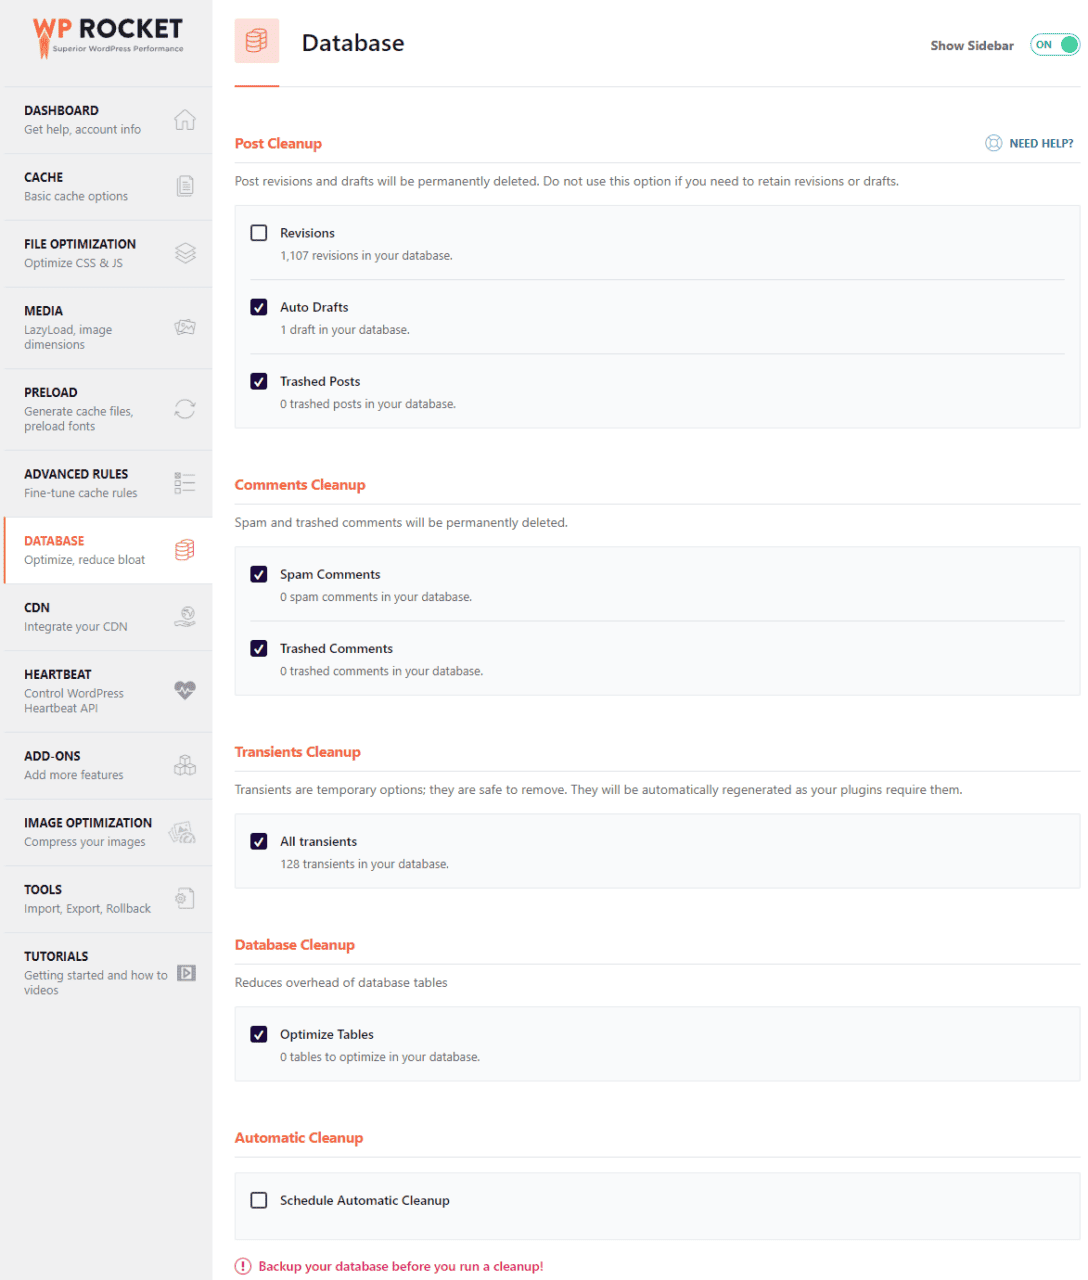
These settings are mostly personal preference and largely depend on whether you use another database cleanup plugin.
For the Database Settings here:
- Post Cleanup
- Revisions – KEEP THIS OFF. Having this enabled will purge all revisions which is not recommended. You want 3 to 10 stored revisions. I set this to 5 on all of my sites.
- Auto Drafts – Enable this if you want but it could be useful to have this disabled. Auto drafts allow your work to be saved so you don’t lose your work if you can’t save often.
- Trashed Posts – Enable this to purge deleted posts.
- Comments Cleanup
- Spam Comments – Enable this to not have to purge spammed comments manually.
- Trashed Comments – Enable this to not have to purge deleted comments manually.
- Transients Cleanup – Enable this to remove expired transients still in your database. This can improve performance. Don’t worry about deleting necessary transients, as you will rebuild the ones you need automatically.
- Database Cleanup – Enable this to optimize your database tables. This doesn’t work on the InnoDB engine.
- Automatic Cleanup – If your host supports this and you don’t use another database plugin, you can enable this and set it to Weekly. Be sure to take regular backups.
WP Rocket CDN Settings
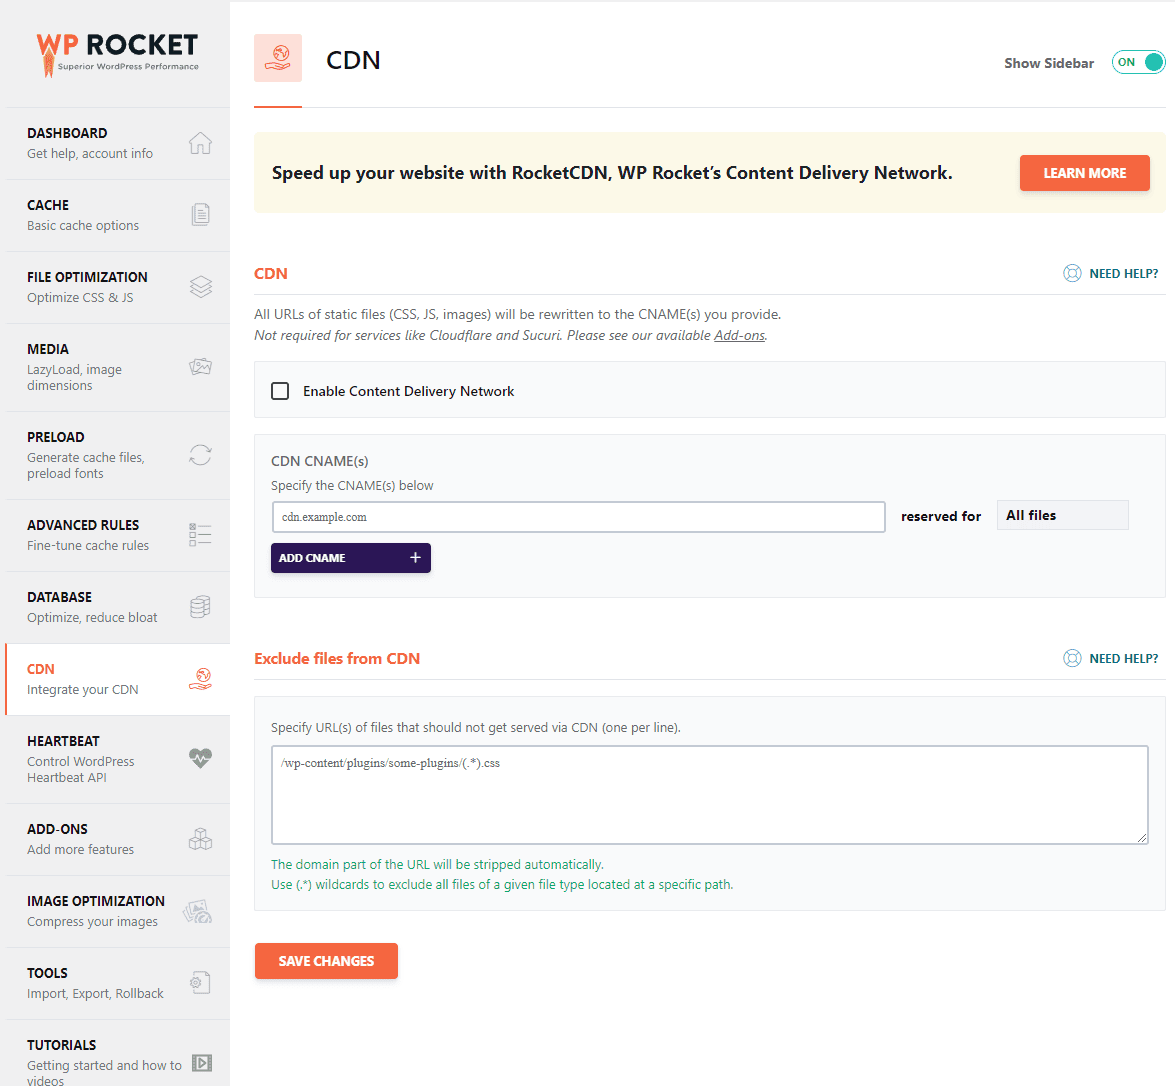
If you don’t use a CDN or you use Cloudflare or Sucuri, there’s nothing to do here. There are some settings to add depending on your CDN of choice.
Check out Using WP Rocket with a CDN for more information.
WP Rocket Heartbeat Settings
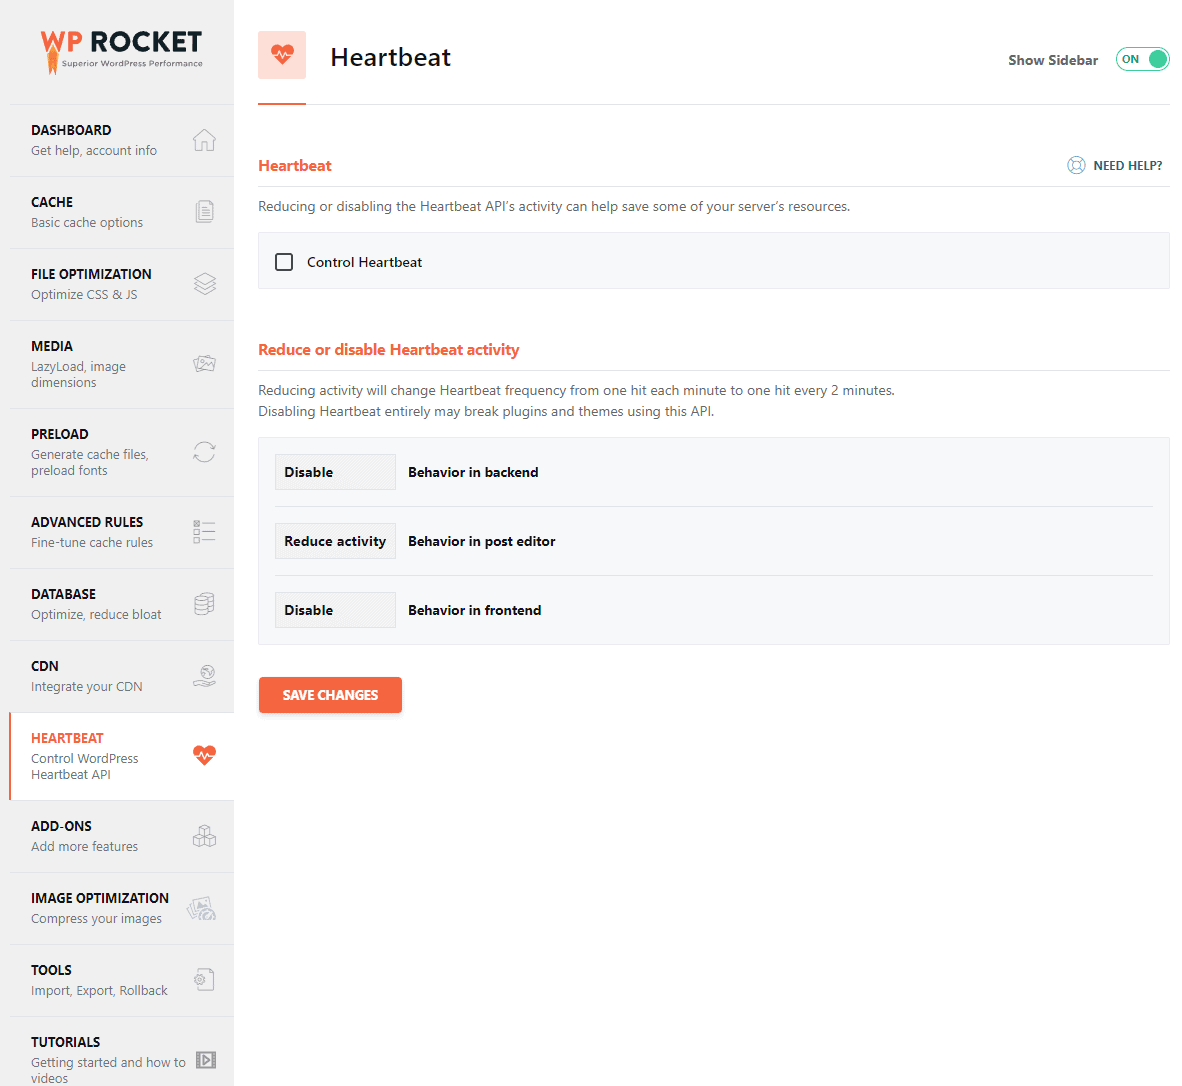
To make sure that your website stays functioning at its best, WP Rocket can be monitored from Heartbeat, the API used by WordPress to help keep track of plugin requests and updates.
Simply enable heartbeat control, set the desired activity, and you’re good to go! If you’re not sure which activity levels you should shoot for, try starting with these:
- Disable behavior in backend.
- Reduce activity behavior in post editor.
- Disable behavior in frontend.
This will improve your performance. If any installed plugins rely on these settings, be sure to test and adjust the settings as necessary.
Disable Control Heartbeat if you use another plugin to control these settings.
WP Rocket Addons Settings
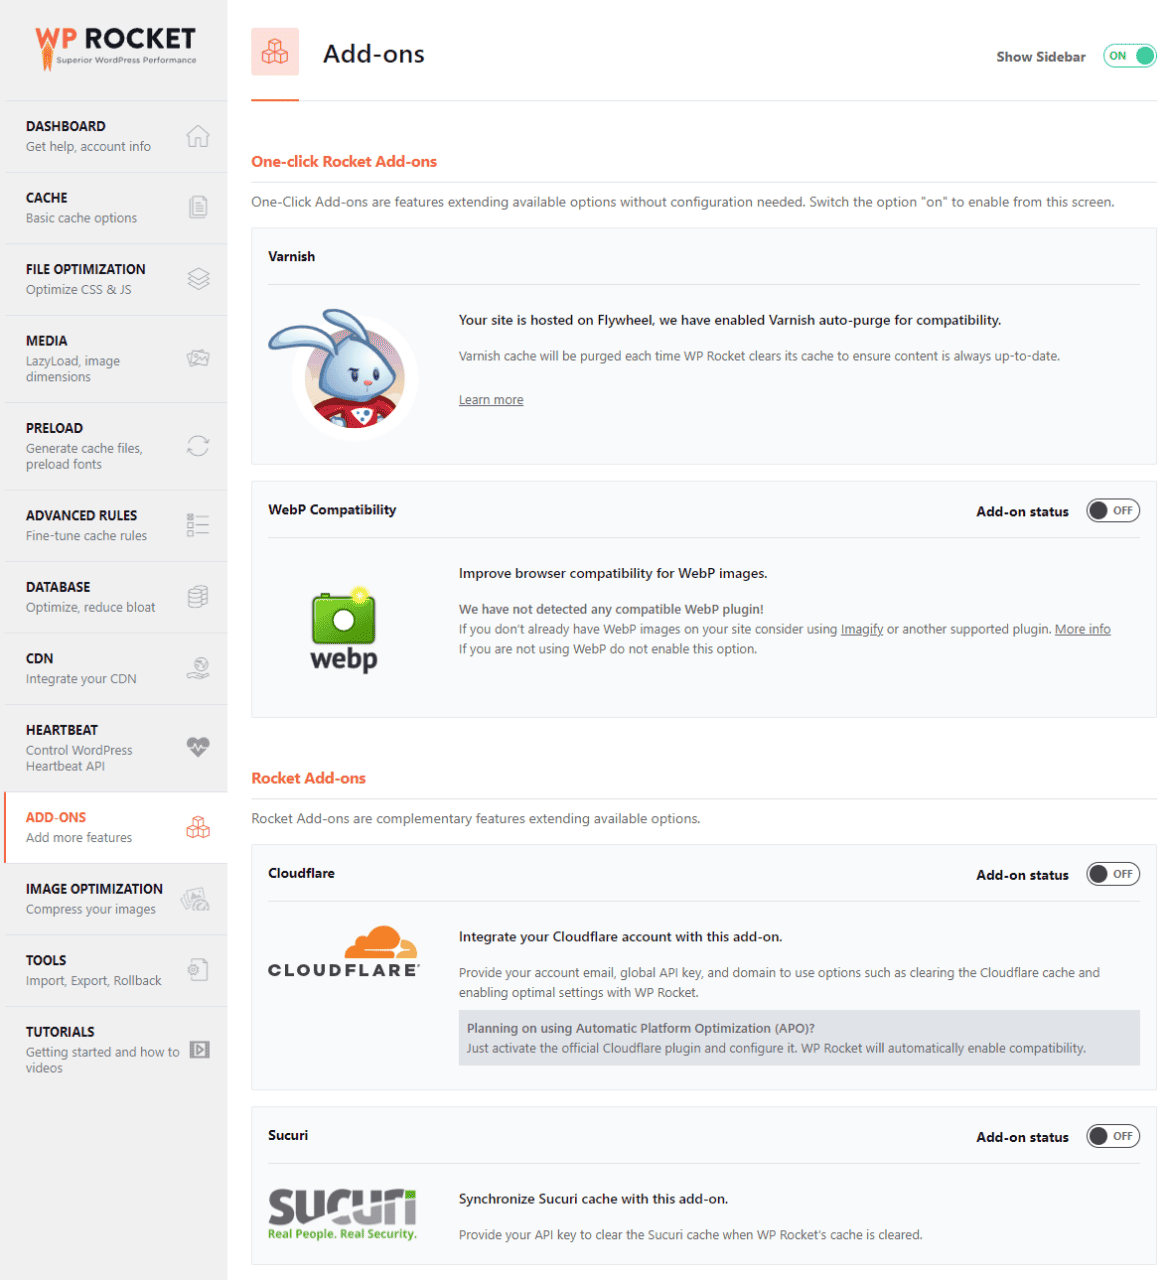
These addons largely depend on whether you use these services or plugins.
For the Addon Settings here:
- Varnish – Enable if your server uses Varnish. You will see this automatically enabled if your host supports this.
- WebP Compatibility – Keep this disabled. Only enable this in some cases when using WebP.
- Cloudflare – Enable if you use Cloudflare, EXCEPT for APO.
- Global API Key – Enter your API key from your dashboard.
- Account Email – Enter the account email you use to sign in.
- Zone ID – Enter your Zone ID key from your dashboard overview tab.
- Development Mode – Keep this disabled unless you need to review your changes immediately.
- Optimal Settings – Enable this to automatically activate recommended settings:
- Standard caching.
- Auto minify for CSS.
- Auto minify for JavaScript.
- Auto minify for HTML.
- Disable Rocket Loader.
- Set browser cache expiration to 1 year.
- Relative Protocol – Keep this disabled unless you use flexible SSL.
- Clear All Cloudflare Cache Files – This isn’t a setting, but knowing where to purge Cloudflare’s cache manually is useful. This cache is usually cleared automatically when WP Rocket’s cache is.
- Sucuri – Enable if you are using Sucuri’s firewall. This clears Sucuri’s cache when WP Rocket’s cache is cleared. Simply enter your Sucuri key to enable.
WP Rocket Image Optimization Settings
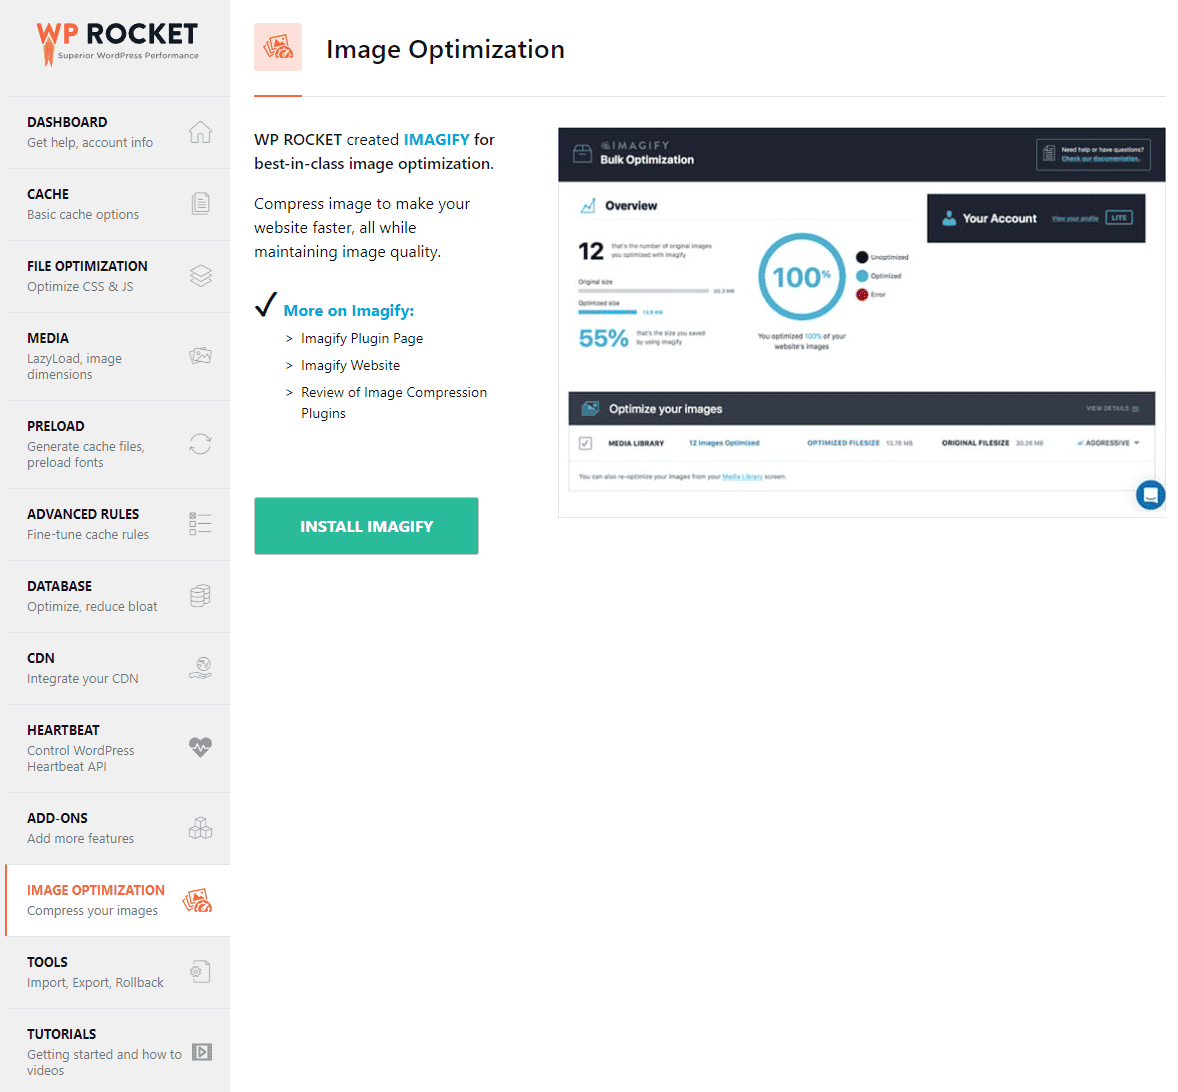
There’s nothing to do here as this is just an advertisement. WP Rocket doesn’t optimize images outside of loading media. Imagify is their plugin for image optimization.
Imagify’s background process for optimizing images doesn’t impact WP Admin performance like ShortPixel, and others can do since it offloads a lot of the processing.
While you do need to optimize your images, there are other better options available.
WP Rocket Tools

This is where you can export and import settings and rollback versions if necessary. You can also update inclusion and exclusion lists manually. Other than these options, there are no settings here.
WP Rocket Tutorials
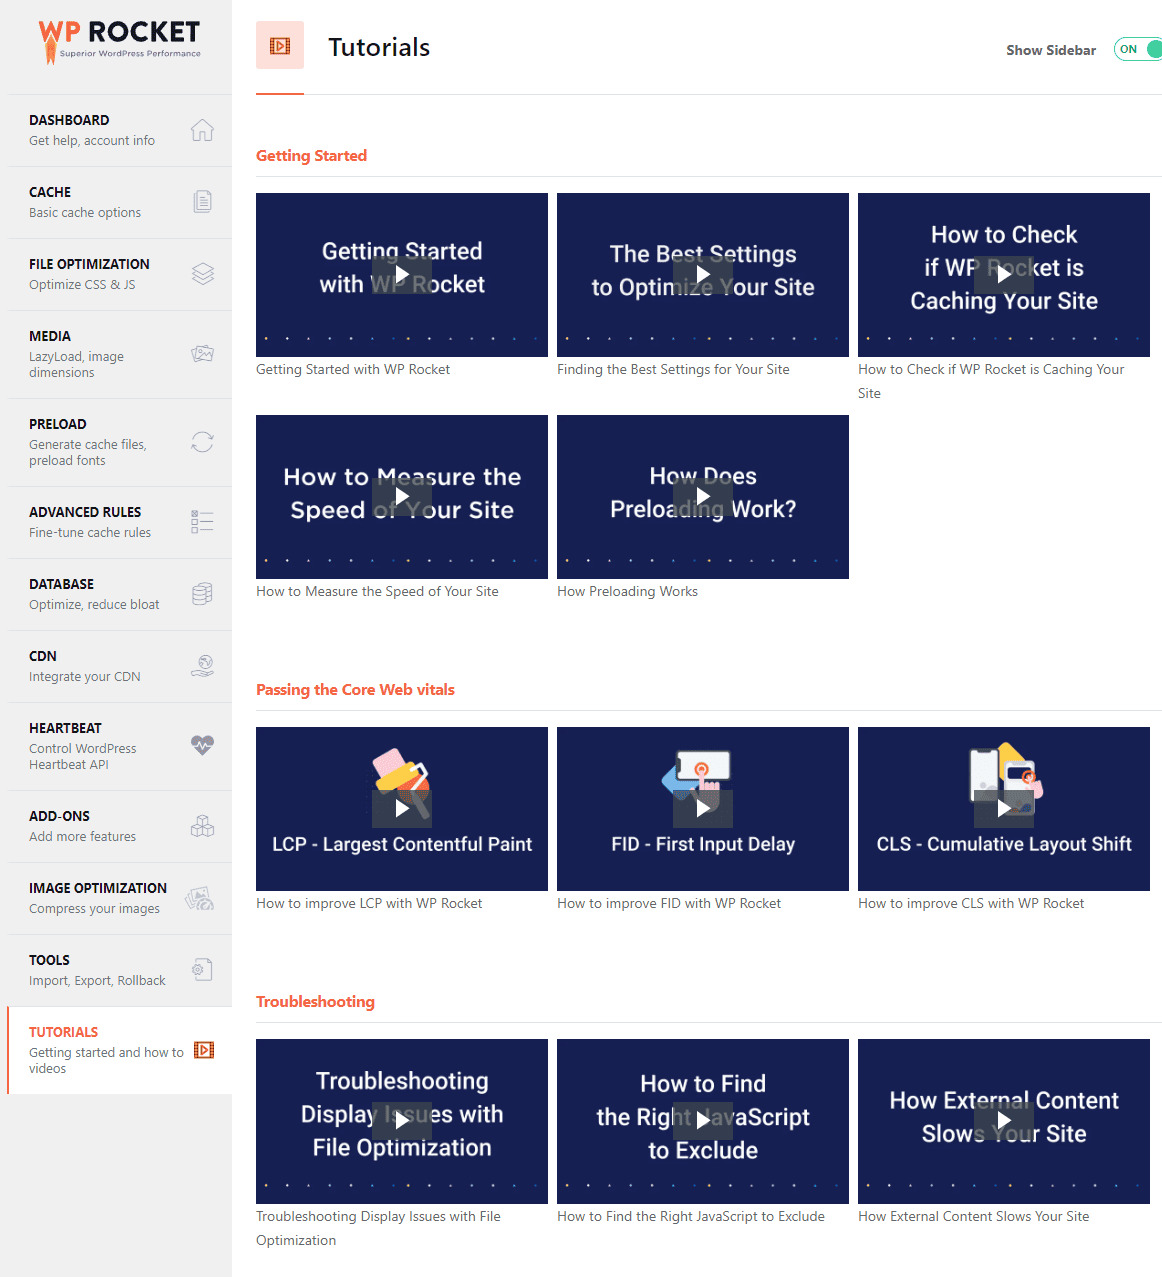
There are no settings here. Just videos for topics you may find interesting.
WP Rocket Pricing

If you’re first starting out, the thought of yet another premium plugin may irritate you, especially if you don’t fully understand why you need something like this.
The good news is that this plugin is sold in 3 broad packages that people can use, and are sold and renewed annually. There is nothing too complicated here.
All the services will receive full support from WP Rocket’s customer service, as well as any updates that the cache plugin receives.
- The least expensive package is the Single WP Rocket deal. This gives you year-long access to the plugin and customer support and updates for a single website. The price for this package currently sits around $50.
- For the next level up for WP Rocket, there is the Plus package deal. For around $100 right now, you will have access to the plugin and technical support for a year, covering three different websites. This deal is essentially selling you the use of this plugin for 3 different websites for the price of 2!
- The most expensive package that is currently available to customers is the Infinite package, at around $250 currently. Like the previous deals, this offer gives you full technical support from the providers of the WP Rocket plugin for a year. However, this package can be used for an unlimited number of websites, perfect for people looking for coverage over many different venues or channels for their business.
WP Rocket works on a 14-day return policy, meaning that, if you are unsatisfied with your purchase, you will get your money back, no questions asked.
Once you are near the end of your deal’s expiration date, usually within the last month, you will receive a notification that your license is close to expiring. You will be prompted to renew it through an email.
It should be noted that once your license expires, you can continue using the plugin, but you won’t get updates, which is the lifeblood of a plugin like this. Eventually, your version will age out and be open to bugs, security vulnerabilities, and not be able to get future optimizations and best practices.
The quality of your website will naturally decrease over time. You will also no longer receive support from the WP Rocket customer support service.
WP Rocket Pros And Cons
We have covered the most important information regarding buying and setting up WP Rocket, what are the pros and cons of using it for your website?
WP Rocket Pros
WP Rocket makes it easy to get the standard optimizations done automatically, right out of the gate, leaving you to optimize as you wish further.
As your website becomes optimized and efficient, you can expect to see loading times cut by nearly 50%. The page score in the 90s can be fully reached without as much effort as doing it yourself.
WP Rocket also includes database optimization, which can help optimize tables, and clear some of the naturally increasing temporary bloat your website produces.
With updates, you don’t have to worry about this plugin being forgotten.
WP Rocket Cons
There is a lack of free options, so you may have trouble verifying the use case of this plugin in your environment without having to shell out the cash beforehand.
Contact with their support team appears to be a time consuming process. We haven’t needed to reach out to them yet, as their documentation is pretty good.
When removing this plugin, you will get an error and have to “Force Deactivate” to fully uninstall.
How Popular Is WP Rocket?
Regardless of what the potential pros and cons are of using WP Rocket for your WordPress website, it can’t be denied that the plugin has become popular since it was launched in 2013.
With several years of successful business, as well as over 900,000 websites using the plugin, it is clear that WP Rocket is well trusted.
WP Rocket Overview – Final Thoughts
WP Rocket isn’t perfect, but it does an excellent job of delivering on its targets. If this looks like a good fit for you, consider taking a look at buying them!
